Note: There’s a companion post to this about using agentic AI here.
Pre(r)amble
I have a problem. Well, I have several problems, but this post is specifically about my habit of seeing a neat looking microcontroller, not really thinking about whether I need another one, and then buying a couple (because, well, you need two just in case, right?).
In the office I have:
- A stack of v1 micro:bits
- Some third party micro:bit clones
- Several v2 micro:bits
- Raspberry Pi Picos (2040)
- DFRobot Beetles (ATmega)
- DFRobot Firebeetles (ESP32)
- Some ESP8266s
- Various ESP32 variants (some camera versions, some plain boards)
How many have I actually gotten around to writing code on? One of the Firebeetles 😂 …and all of the micro:bits. Why? Having nice accessible inputs and outputs makes programming so much more enjoyable. The micro:bit completely nails this - no faffing around with which pin to use for the buttons, no I2C or SPI nonsense needed to poke at the accelerometer, and nothing funky to do to access the display, sound, or mic. Just use the nice simple API, load the code via USB and off you go. Even when running peripheral sensors, servos, etc the micro:bit is just a joy to get going with.
ESP-NOW and the Cheap Yellow Display
Why am I talking about micro:bits when the post is about ESP boards? I read a couple of posts on the pretty great Random Nerd Tutorials site that made me think that I could have a similar experience to the micro:bit with ESP32:
- MicroPython: ESP-NOW with Micropython
- MicroPython: ESP32 Cheap Yellow Display Board - CYD (ESP32-2432S028R)
ESP-NOW is a nice simple network solution (Micropython docs here) that doesn’t rely on existing wifi networks. As soon as I started reading some of the details it felt a lot like the really basic networking that I love so much in micro:bits.
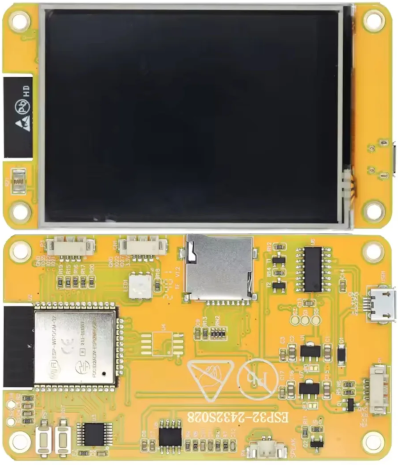
The ESP-CYD board feels a bit like the micro:bit, even though the features are quite different:
- 320x240 colour display
- Resistive touch screen
- 1 RGB LED
- red, green, blue LED
- 1 light dependent resistor (LDR)
- Speaker
- Some spare GPIO pins, microSD slot, etc
Despite the differences, it has a lot of the qualities I quite like about the micro:bit - a built in output method that’s pretty rich (the display and some blinky lights), some accessible inputs (the touch screen and the LDR). Add easy networking into the mix and you have something that doesn’t require too much fiddling to get working and you can chain other devices to it over the network.
Bridging the gap
TL;DR I spent a few weeks in the dead hours of the mornings wrangling an AI coding agent into writing some simplified libraries for the ESP-CYD to get it to be more micro:bit like.
This post is mostly about the API, not the development process. Where the API landed feels like a fairly good place, although I’ve only really done a bunch of preliminary testing on my own devices. If you’ve got strong feelings about it, either send me an email, or force me to figure out how to use Github properly 😅.
Overall the aim was to provide a simple API for students, to remove the need to use any configuration of pins and just get going with a program. I started out by just writing a wrapper over the top of the libraries used in the tutorials, but then decided to go on a magical AI agent journey and see if I could learn a bit about using AI for a complete project and get something worthwhile out the other end.
The display
Pushing pixels in terms of shapes and colours isn’t too exciting, and the library from rdagger that Rui and Sara Santos use in their tutorial over at RNT does a good job at doing all the things you probably want to do with it.
A couple of things I wanted to change or add were:
- Being able to do simple text logging to the screen. This meant text wrapping, and passing multiple lines to be drawn.
- Try and address some of the slow drawing issues
Looking over the original library and what the LLM spat out, there’s not much difference overall, apart from hiding hardware configuration details and some of the text behaviour.
from easy_display import Display

display = Display()

display.show_text("Hello world!")
The radio
This is where I really wanted to make a lot of changes to the original API. The ESP-NOW library is pretty good, but I wanted to make it broadcast by default, add student-facing options for setting transmission power, add group filtering like the micro:bit, and have an accessible method for examining the signal strength of incoming packets.
I’m actually really happy how this turned out, although the micro:bit API has a simple receive and a full receive function, whereas my API just has an extended receive function.
Let’s look at some typical micro:bit receive code:
from microbit import *
import radio

radio.on()
while True:
    msg = radio.receive()
    if msg:
        print(msg)
…and my ESP-NOW wrapper library:
from easy_radio import Radio

radio = Radio()

while True:
    msg = radio.receive()
    if msg:
        print(msg["text"])
The library also includes groups (artificial filtering based on group ID) with a 0 ID for
promiscuous mode, since sometimes snooping is useful!
The touch screen
The touch screen needed a fair bit of work to get it to where I wanted it to go. The original xpt2046 library is pretty basic and just captures individual touches. I wanted to go full micro:bit and draw inspiration from both the button API and the acclerometer API. These do a great job of helping students by allowing them to interrogate past events, not just those that are happening when students poll the hardware.
The micro:bit has neat methods like was_pressed(), get_presses(), and was_gesture() that are
really useful for students who like to throw sleep() calls into their event loops and so block
code left right and centre. This means having event queues that get populated via hardware callbacks
so that nothing gets in the way of student code.
In the end I got a similar set of methods for the touch interface:
is_touched()was_touched()get_last_touch_coords()get_touches()was_swiped([direction], [bounds])
Swipes turned out to be really tricky, since when a release event is registered it’s too late to ask the hardware for the touch coordinates, meaning that you need to poll for touch positions between a press and a release, without impacting performance too much.
Additionally, the touch screen and display are separate devices and so have different orientations and coordinates. I added an integrated configuration and calibration method that gets run and auto saved when the touch library is used for the first time.
Putting it all together
Let’s look at how to create a simple program that gets input from the touch screen, displays it as a circle, and then sends the touch to other devices via broadcast transmission. When a device receives a different device’s touch coordinates, it draws it to its own screen in a different colour.
from easy_display import Display
from easy_touch import Touch
from easy_radio import Radio
from time import sleep

touch = Touch()
display = Display()
radio = Radio()

while True:
    if touch.was_touched():
        x, y = touch.get_last_touch_coords()
        display.draw_circle(x, y, 3, color="yellow")
        radio.send(f"{x},{y}")
    msg = radio.receive()
    if msg:
        try:
            x, y = msg["text"].split(",")
            display.draw_circle(int(x), int(y), 3, color="red")
        except:
            pass
    sleep(0.01)